как установить phpmyadmin windows 10
Установка веб-сервера Apache, MySQL, PHP, phpMyAdmin на Windows 10
У вас на этой странице три возможных пути : послушать хорошую музыку, посмотреть видео или читать мозголомно-ядерную статью об установке веб-сервера Apache, MySQL, PHP, phpMyAdmin на Windows 10. Выбирайте любое!
Подготовка – скачать: Apache, PHP, MySQL, phpMyAdmin
Создание структуры веб-сервера
В корне диска (C:) создать каталог Server. В каталоге создаем 2 подкаталога: bin (Apache, PHP, MySQL) и data (сайт и база данных).
В каталоге data создаем две папки: DB (здесь будут храниться базы данных), htdocs (для нашего сайта).
Распаковываем файлы Apache (из архива httpd-2.4.39-win64-VC15.zip) в C:\Server\bin\ только каталог Apache24.
Переходим в каталог C:\Server\bin\Apache24\conf\ и открываем файл httpd.conf.
Клавиши (Win+X). Выбор Windows PowerShell (администратор).
Установка и настройка MySQL
В каталог bin распаковываем файлы MySQL (из архива mysql-8.0.16-winx64.zip). Переименовываем папку mysql-8.0.16-winx64 переименовать в mysql-8.0. Заходим в эту папку и создаём там файл my.ini Открываем этот файл любым текстовым редактором.
Добавьте туда следующие строки:
sql_mode=NO_ENGINE_SUBSTITUTION,STRICT_TRANS_TABLES
datadir=»C:/Server/data/DB/data/»
Выполняем инициализацию и установку:
В каталоге C:\Server\data\DB\data\ должны появиться автоматически сгенерированные файлы и служба MySQL будет запускаться при каждом запуске Windows.
Установка и настройка PHP
В папке C:\Server\bin\ создаём каталог PHP и копируем в него содержимое архива (php-7.3.5-Win32-VC15-x64.zip).
В файле C:\Server\bin\Apache24\conf\httpd.conf в самый конец добавляем строчки:
В каталоге C:\Server\data\htdocs\ создаём файл i.php
Копируем в этот файл:
В браузере открываем ссылку http://localhost/i.php. PHP работает.
Настройка PHP проходит в файле php.ini. Берем php.ini-development и задаем новое имя php.ini (прежде сделав резервную копию файла php.ini-development).
Открываем файл php.ini ищем строчку:
; extension_dir = «ext» меняем на extension_dir = «C:\Server\bin\PHP\ext\»
Найти группу строк:
;extension=bz2
;extension=curl
;extension=fileinfo
;extension=gd2
;extension=gettext
;extension=gmp
;extension=intl
;extension=imap
;extension=interbase
;extension=ldap
;extension=mbstring
;extension=exif ; Must be after mbstring as it depends on it
;extension=mysqli
;extension=oci8_12c ; Use with Oracle Database 12c Instant Client
;extension=openssl
;extension=pdo_firebird
;extension=pdo_mysql
;extension=pdo_oci
;extension=pdo_odbc
;extension=pdo_pgsql
;extension=pdo_sqlite
;extension=pgsql
;extension=shmop
Заменить на:
EXTENSION=bz2
EXTENSION=ftp
EXTENSION=CURL
EXTENSION=FILEINFO
EXTENSION=GD2
EXTENSION=GETTEXT
EXTENSION=GMP
EXTENSION=INTL
EXTENSION=IMAP
EXTENSION=INTERBASE
EXTENSION=LDAP
EXTENSION=MBSTRING
EXTENSION=EXIF ; MUST BE AFTER MBSTRING AS IT DEPENDS ON IT
EXTENSION=MYSQLI
EXTENSION=OCI8_12C ; USE WITH ORACLE DATABASE 12C INSTANT CLIENT
EXTENSION=ODBC
EXTENSION=OPENSSL
EXTENSION=PDO_FIREBIRD
EXTENSION=PDO_MYSQL
EXTENSION=PDO_OCI
EXTENSION=PDO_ODBC
EXTENSION=PDO_PGSQL
EXTENSION=PDO_SQLITE
EXTENSION=PGSQL
EXTENSION=SHMOP
Раскомментировать группу строк:
;extension=php_soap.dll
;extension=soap
;extension=sockets
;extension=sqlite3
;extension=tidy
;extension=xmlrpc
;extension=xsl
Установка и настройка phpMyAdmin
В каталог C:Server\data\htdocs копируем содержимое архива phpMyAdmin-4.8.5-all-languages.zip. Переименовываем phpMyAdmin-4.8.5-languages в phpmyadmin.
В каталоге C:Server\data\htdocs\phpmyadmin создаём файл config.inc.php и копируем:
Имя пользователя вводим root. Поле пароля оставляем пустым.
Использование сервера и бэкап данных
В каталоге C:\Server\data\htdocs\ создавайте папки и файлы, например:
C:\Server\data\htdocs\test\ajax.php – этот файл, будет доступен по адресу http://localhost/test/ajax.php и т.д.
Для создания полного бэкапа всех сайтов и баз данных достаточно скопировать каталог C:\Server\data\.
Перед обновлением модулей, делайте бэкап папки bin – в случае возникновения проблем, можно будет легко откатиться к предыдущим версиям.
При повторной установке сервера или при его обновлении, необходимо заново настраивать конфигурационные файлы. Если у вас есть копии этих файлов, то процесс можно значительно ускорить. Желательно забэкапить следующие файлы:
C:\Server\bin\Apache24\conf\httpd.conf
C:\Server\bin\mysql-8.0\my.ini
C:\Server\bin\PHP\php.ini
C:\Server\data\htdocs\phpMyAdmin\config.inc.php
В них хранятся все настройки.
Дополнительная настройка PHP
При решении многих задач можно упереться в ограничения, установленные в настройках. Эти настройки содержаться
в файле php.ini (C:\Server\bin\PHP\php.ini) Рассмотрим некоторые из них:
memory_limit = 128M
Устанавливает максимальное количество памяти, которое может использовать скрипт.
—
post_max_size = 8M
Устанавливает максимальное количество данных, которые будут приняты при отправке методом POST.
—
;default_charset = «UTF-8»
Устанавливает кодировку (по умолчанию, строка закомментирована).
—
upload_max_filesize = 2M
Максимальный размер загружаемого на сервер файла. Изначально установлен очень маленький размер – только два мегабайта. Например, при загрузке базы данных в phpMyAdmin, не получится загрузить файл больше 2 мегабайт до тех пор, пока не будет изменён этот пункт настройки.
—
max_file_uploads = 20
Максимальное количество файлов для загрузки за один раз.
—
max_execution_time = 30
Максимальное время выполнения одного скрипта. Менять эти настройки необязательно, но полезно о них знать.
Создание собственного сайта
Совственно, с этого момента (ссылка) вы можете посмотреть как создать сайт на локальном диске.
Как установить phpMyAdmin
phpMyAdmin – простое приложение с открытым исходным кодом, позволяющее управлять базами данных MySQL. С его помощью можно администрировать пользователей, создавать и редактировать таблицы, а также проводить экспорт и импорт данных в них. Удобство состоит в том, что все эти операции можно проводить в веб-интерфейсе. Я расскажу, как установить phpMyAdmin на компьютер и на сервер.
Установка phpMyAdmin на компьютер
Прежде чем начать установку phpMyAdmin, убедитесь, что у вас установлены и настроены сервер Apache, PHP и базы данных MySQL. Еще нужно соединение с сервером по защищенному туннелю SSH. Этот способ скорее можно назвать ручным.
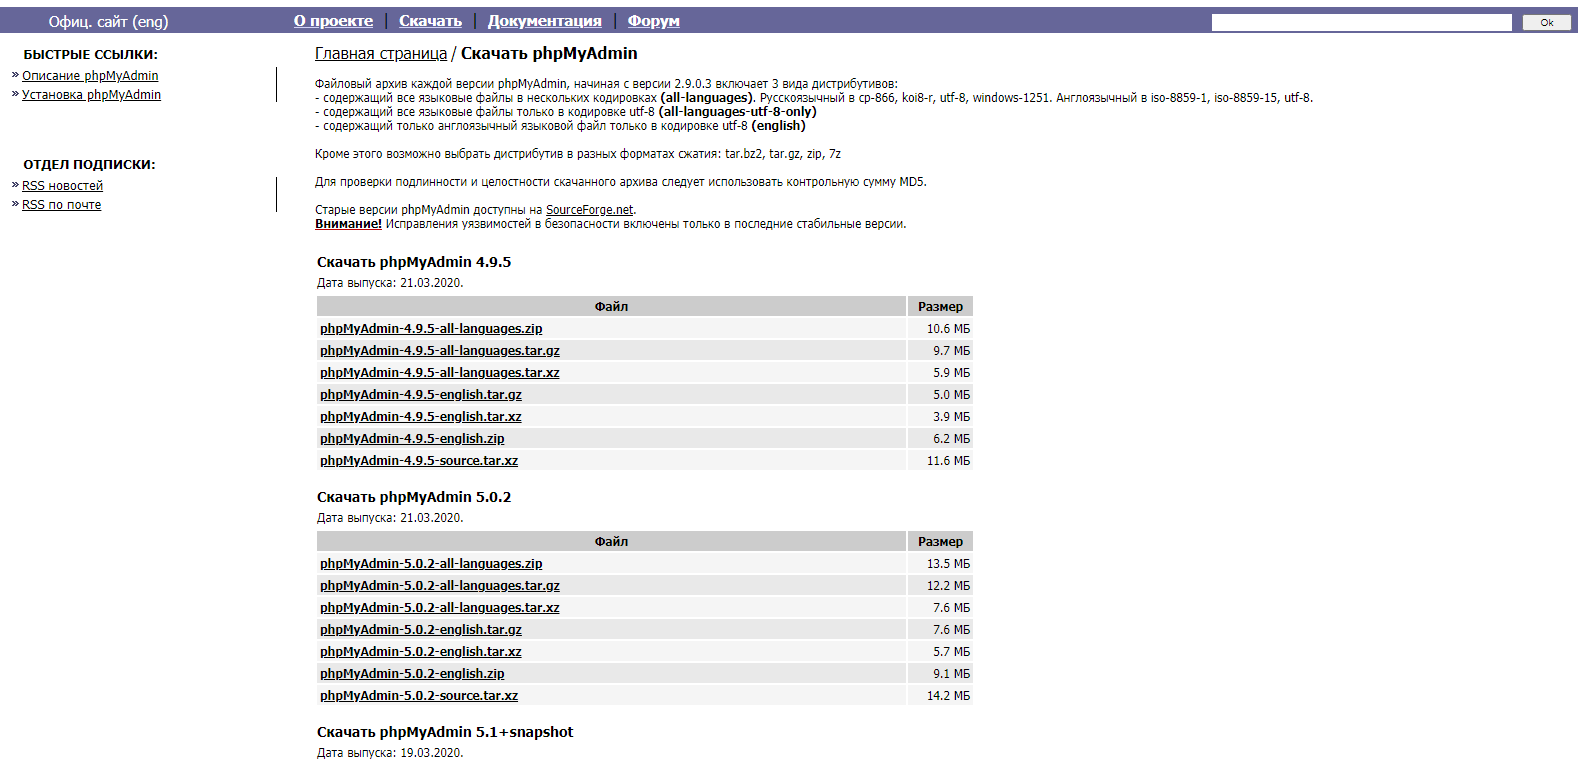
Сперва советуем скачать архив приложения с официального русскоязычного сайта. Выбираем любую удобную версию и жмем по ссылке для начала загрузки.
Как только процесс загрузки завершится, распакуем архив. Затем переходим в папку htdocs, расположенную на системном диске в директории «Apache». Сюда вставляем папку из архива, потом переименовываем ее в phpmyadmin.
Теперь открываем папку «PHP» и находим в ней файл «php.ini-production». Переименовываем его в php.ini, а потом открываем с помощью «Блокнота». Находим в тексте строчки «extension=php_mysqli.dll» и «extension=php_mbstring.dll» и удаляем в них символ точки с запятой. Сохраняем изменения, выходим из блокнота.
Если все сделано правильно, то после введения в адресной строке браузера запроса http://localhost будет открываться страница авторизации phpMyAdmin.
Установка phpMyAdmin на сервер
Процедура установки инструмента phpMyAdmin на сервер отличается для разных операционных систем. Требования примерно те же – соединение по защищенному туннелю SSH, предустановленное программное обеспечение PHP, MySQL, Nginx или Apache.
Ubuntu
Перед установкой phpMyAdmin на сервере с ОС Ubuntu прежде всего необходимо проверить, имеется ли расширение PHP для редактирования текстовых строк в формате юникода. Для этого в командной строке вводим вот такой запрос:
После завершения обновления можно приступать к установке нужного нам инструмента на сервер.
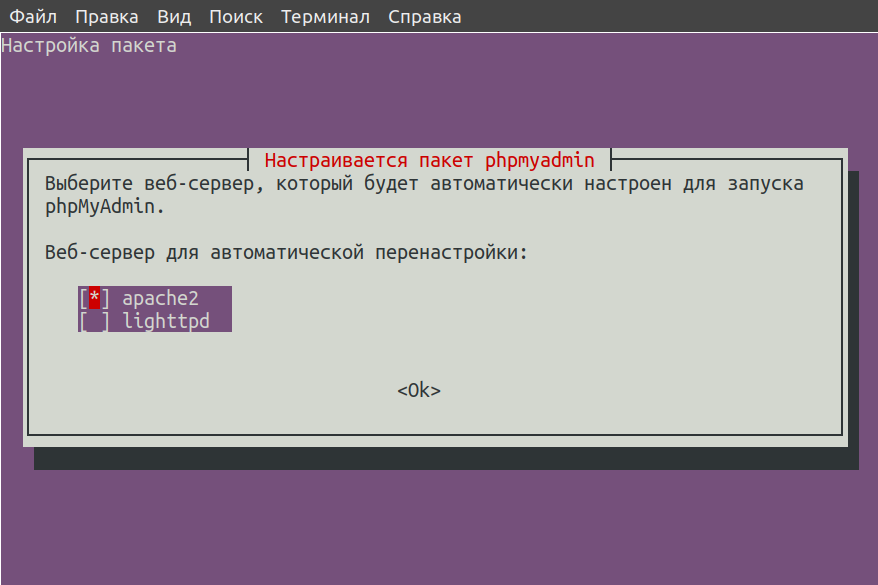
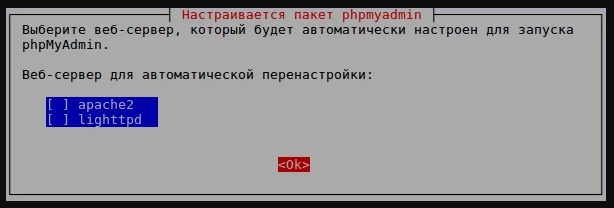
Как только данная команда активируется, откроется установщик. В нем будет предложен выбор веб-сервера для работы с приложением в дальнейшем. С помощью пробела выбираем пункт «apache», потом отмечаем кнопку ОК для применения изменений.
Если на вашем сервере установлен Nginx, на этом моменте просто выберите соответствующий пункт.
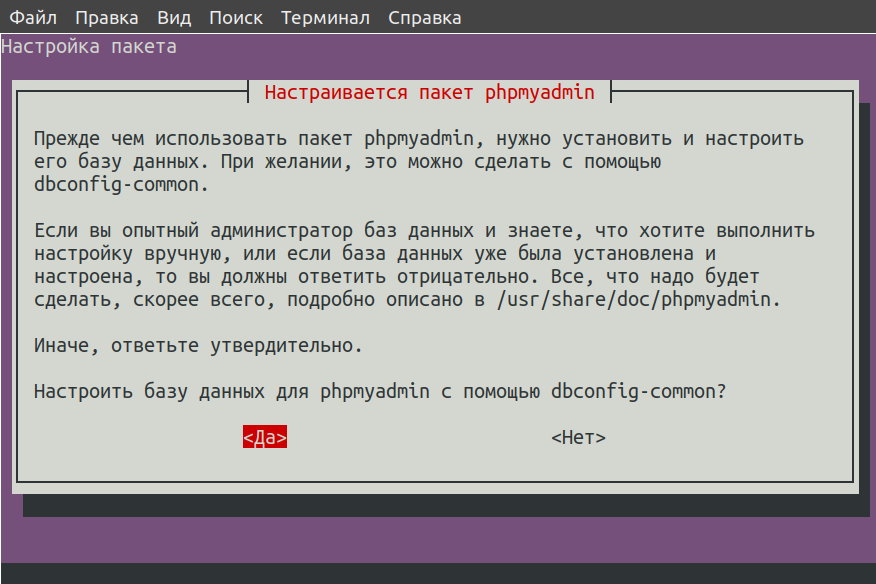
Далее будет предложено создание баз данных для данного ПО, в которой будет вся служебная информация. Соглашаемся, нажав на кнопку «Да», и идем дальше.
Следующий этап – создание пароля для собственного профиля. Можно придумать новый или оставить поле пустым, чтобы сервис сгенерировал случайную комбинацию. Потом, если мы все же придумали свой пароль, его следует подтвердить.
Но установка phpMyAdmin на сервер не завершена. Нам необходимо включить расширения PHP mcrypt и mbstring, используя для этого нижеуказанные команды:
Чтобы применить все изменения, перезапускаем сервер Apache с помощью специального запроса:
Debian
В случае с Debian был заранее предустановлен стек LEMP, включающий NGINX, MySQL и PHP. Но если что-то из всего этого на сервере отсутствует, можно задать в терминале вот такую команду:
Ждем завершения скачивания и установки всех пакетов. Еще для защиты аутентификации рекомендуется установить сертификат SSL/TLS для передачи зашифрованного трафика.
Так как в Debian большинство программ в репозиториях отсутствует, необходимо будет вручную добавить пункт с phpMyAdmin. Сперва открываем файл «sources.list» в редакторе вот такой командой:
Теперь вносим кое-какие изменения в самом конце файла, добавив следующие строчки:
Сохраняем изменения и выходим из редактора. Теперь надо обновить базы данных в терминале с помощью такого запроса:
А вот теперь можно приступать непосредственно к скачиванию нужного нам приложения. Вписываем следующую команду:
Так как у нас заранее предустановлен Nginx, в момент настройки нам не нужно будет выбирать веб-сервер. Просто пропускаем этот пункт, нажав на кнопку «Tab», а затем кликнув на ОК.
Выйдет новое окно в мастере установки, запрашивающее разрешение на использование «dbconfig-common». Данный параметр позволит настроить базу данных и пользователя с правами администратора для программы phpMyAdmin. Поэтому выбираем пункт «Да» и идем дальше.
Точно так же, как было описано ранее, создаем собственный пароль или оставляем поле пустым для генерации случайного. Теперь ждем, когда все пакеты ПО будут до конца установлены. Для проверки в адресной строке браузера вбиваем адрес http://доменное_имя или IP/phpmyadmin.
CentOS
Здесь тоже заранее инсталлированы модули PHP и Apache. Чтобы установить phpMyAdmin на CentOS, прежде всего понадобится скачать расширенный репозиторий EPEL. Для этого мы задаем вот такую команду:
Если указанный репозиторий не скачать, командная строка может дать ошибку типа «пакета с названием phpmyadmin не найдено».
Скачивание пакета завершено, теперь можем приступать к скачиванию самой программы, и даем для этого следующий запрос:
Потом устанавливаем модули PHP для нормальной работы панели управления базами данных, и делается это одним запросом:
Возможно, они уже были установлены ранее, но все же стоит дополнительно выполнить проверку. Потом перезапускаем сервер для принятия всех внесенных изменений.
Понадобится настроить виртуальный домен, создав для этого специальный конфигурационный файл.
Содержание его при этом должно быть таково:
Сохраняем изменения и закрываем редактор. Затем проверяем корректность настроек вот такой командой:
Если ошибки не возникли, перезапускаем сервер. Если же возникли, заново вносим изменения в только что созданный файл.
Дополнительно можно еще создать отдельный каталог для хранения временных файлов с помощью такого запроса:
Потом потребуется задать для нее владельца и соответствующие права специальными командами:
Настройка завершена. Теперь можно открыть страницу с виртуальным доменом. В результате мы должны попасть на страницу с формой для ввода имени пользователя и пароля.
Статья Установка и настройка сервера Apache, PHP, MySQL, phpMyAdmin на Windows 10
Если вы в точности будите следовать всем пунктам данной инструкции, то у вас обязательно всё заработает, независимо от вашей версии Windows!
Вверху страницы представлено две версии Apache Win64 или Win32. Если у вас 64-битная Windows, то выберите любую (это непринципиально и на работу никак не скажется. Только следуйте правилу, чтобы все версии компонентов сервера были одной битности). Я выбрал 64-битную версию.
Переходим на сайт для скачивания PHP. Версий много, с непривычки можно запутаться. Самые свежие версии находятся сверху. В разделе PHP 5.6 четыре варианта. Выберите Thread Safe, а также 64 или 32 бита. Например, я выбрал VC11 x64 Thread Safe.
Если нажать на кнопку Download, то мы переходим на страницу, где две большие кнопки предлагают нам создать аккаунт или войти в уже существующий. Это необязательно, достаточно просто нажать маленькую надпись внизу «No thanks, just start my download» («Нет, спасибо, просто начните мою загрузку»).
Практически обязательным элементом сервера стал phpMyAdmin, его скачиваем с этой страницы.
Если предыдущие скаченные файлы различались битностью, то для phpMyAdmin такого понятия нет, т. к. он состоит из PHP скриптов.
Для работы PHP (а также Apache) необходимо установить Visual C++ Redistributable for Visual Studio 2012 с официального сайта Microsoft. Для этого нужно перейти по ссылке.
При попытке запуска, Apache пожалуется на отсутствие файла и запускаться откажется. Этот файл является частью Visual C++ Redistributable for Visual Studio 2015, поэтому заблаговременно скачиваем его по ссылке (выбираем 32- или 64-битную версию).
Загружаемый файл будет иметь имя vc_redist.x64.exe.
2. Выбор структуры сервера.
Теперь всё готово, можно начинать. Несколько слов о структуре нашего сервера.
На диске C создаём каталог Server, в нём создаём каталоги bin (сюда будем устанавливать Apache, PHP, MySQL) и data (здесь будет наш сайт и база данных).
Казалось бы, для чего это нужно? На самом деле, это упрощает резервное копирование. Например, папка bin меняется очень редко и бэкапить её каждый день нет смысла. Напротив же, содержимое нашего сайта и баз данных может меняться ежедневно и имеет смысл делать резервную копию папки data часто. Когда мы обновляем файлы сервера, например, ставим новую версию PHP, то мы можем принудительно сделать копию bin и, в случае ошибок, без проблем откатиться на более старую версию.
В каталог bin распаковываем файлы Apache (из архива httpd-2.4.12-win64-VC11.zip), точнее нас интересует только папка Apache24.
How to install phpMyAdmin on Windows 10
Hey, what’s up? Today we’re going to talk about install phpMyAdmin on WIndows 10. This is open-source software, designed to handle the administration and management of MySQL databases through a graphical user interface. Through this application, we can create, modify and delete records. It is also possible to import and export tables from the MySQL database. In addition, we can execute MySQL queries, optimize and repair the database and many more tasks. Well, in this post we are going to see how to install phpMyAdmin in Windows 10.
Prerequisites
To make use of this tool, the webserver must obviously be configured and running correctly. In like manner, here in osradar.com, I show you how to install and configure the following elements:
Download the latest version of phpMyAdmin.
In the first place, go to the official phpMyAdmin website and download the latest version of the tool from there At the time of writing this post, the version is 5.0.

Then unzip the file and rename it to phpMyAdmin. Then drag this folder to the next path: C:\Apache24\htdocs

Set up some phpMyAdmin files.
To ensure the correct functioning of the tool, it is necessary to make some previous configurations. First, inside the program folder, locate the file config.sample.inc.php. Then, rename it to config.inc.php.

Finally, you have to modify it with your favorite text editor. Please select the next line:
Enter a value of your choice, minimum of 32 characters long:
Finally, save the configuration file.
Enable the necessary extensions.
On the other hand, it is necessary to enable the extensions required for the operation of the tool. With this intention, remove the ; at the beginning of the extension, as shown here. With this intention, open the file php.ini located in the php folder.

The extensions to be enabled are the following:

Finally, save the configuration and restart the Apache server. With this in mind, press the Win+R combination and run the services.msc command. Once the list of services is open, locate the Apache HTTP Server, and restart it.

Login to phpMyAdmin
Once you have made your settings, it is time to login to phpMyAdmin. To do so, please open the following address in your web browser: http://localhost/phpmyadmin/ Once there, please enter your MySQL username and password:

After entering the credentials, the tool’s Dashboard will be displayed. Additionally, when you scroll down the page, a warning sign appears.

This warning is shown because the tool needs a database to work. In case you have not created it before, it is possible to import it from the same installation folder. With this in mind, please click on the Import menu. Then navigate to the following path: C:\Apache24\htdocs\phpMyAdmin\sql. And from there, select create_tables.sql

Consequently, a database will be created under the name phpmyadmin

Once the database is created, you have to exit the tool by clicking on the door with the small green arrow.

Then, modify the values referred to the user who will manipulate the database. In addition, it enables the database and table storage parameters. To do this, it eliminates the double slashes in front of them. Likewise, in the line corresponding to user control, it adds localhost. Also, it modifies the value controluser and controlpass with the user and the password of MySQL. To graph the process I show you the code before editing it and where you should make the changes.

Below is the appearance of the correctly modified phpMyAdmin configuration file.

Save the configuration and go back to phpMyAdmin. The warning message should have disappeared.

Ultimately, we have seen how to install phpMyAdmin on Windows 10. This tool facilitates the management and administration of MySQL. I hope you enjoyed this post. See you soon!
Installation
phpMyAdmin does not apply any special security methods to the MySQL database server. It is still the system administrator’s job to grant permissions on the MySQL databases properly. phpMyAdmin’s Users page can be used for this.
Linux distributions
Debian and Ubuntu
Most Debian and Ubuntu versions include a phpMyAdmin package, but be aware that the configuration file is maintained in /etc/phpmyadmin and may differ in some ways from the official phpMyAdmin documentation. Specifically, it does:
More specific details about installing Debian or Ubuntu packages are available in our wiki.
More information can be found in README.Debian (it is installed as /usr/share/doc/phpmyadmin/README.Debian with the package).
OpenSUSE
OpenSUSE already comes with phpMyAdmin package, just install packages from the openSUSE Build Service.
Gentoo
Gentoo ships the phpMyAdmin package, both in a near-stock configuration as well as in a webapp-config configuration. Use emerge dev-db/phpmyadmin to install.
Mandriva
Mandriva ships the phpMyAdmin package in their contrib branch and can be installed via the usual Control Center.
Fedora
Fedora ships the phpMyAdmin package, but be aware that the configuration file is maintained in /etc/phpMyAdmin/ and may differ in some ways from the official phpMyAdmin documentation.
Red Hat Enterprise Linux
Red Hat Enterprise Linux itself and thus derivatives like CentOS don’t ship phpMyAdmin, but the Fedora-driven repository Extra Packages for Enterprise Linux (EPEL) is doing so, if it’s enabled. But be aware that the configuration file is maintained in /etc/phpMyAdmin/ and may differ in some ways from the official phpMyAdmin documentation.
Installing on Windows
The easiest way to get phpMyAdmin on Windows is using third party products which include phpMyAdmin together with a database and web server such as XAMPP.
You can find more of such options at Wikipedia.
Installing from Git
In order to install from Git, you’ll need a few supporting applications:
You can clone current phpMyAdmin source from https://github.com/phpmyadmin/phpmyadmin.git :
Additionally you need to install dependencies using Composer:
If you do not intend to develop, you can skip the installation of developer tools by invoking:
Finally, you’ll need to use Yarn to install some JavaScript dependencies:
Installing using Composer
You can install phpMyAdmin using the Composer tool, since 4.7.0 the releases are automatically mirrored to the default Packagist repository.
The content of the Composer repository is automatically generated separately from the releases, so the content doesn’t have to be 100% same as when you download the tarball. There should be no functional differences though.
To install phpMyAdmin simply run:
Alternatively you can use our own composer repository, which contains the release tarballs and is available at :
Installing using Docker
phpMyAdmin comes with a Docker official image, which you can easily deploy. You can download it using:
Docker environment variables
You can configure several phpMyAdmin features using environment variables:
Allows you to enter a database server hostname on login form.
Hostname or IP address of the database server to use.
Comma-separated hostnames or IP addresses of the database servers to use.
Used only if PMA_HOST is empty.
Verbose name of the database server.
Comma-separated verbose name of the database servers.
Used only if PMA_VERBOSE is empty.
Port of the database server to use.
Comma-separated ports of the database server to use.
Used only if PMA_PORT is empty.
The fully-qualified path ( https://pma.example.net/ ) where the reverse proxy makes phpMyAdmin available.
If defined, this option will hide the PHP version ( expose_php = Off ). Set to any value (such as HIDE_PHP_VERSION=true ).
If set, this option will override the default value for apache and php-fpm (this will change upload_max_filesize and post_max_size values).
Format as [0-9+](K,M,G) default value is 2048K
If set, this option will override the default config.inc.php with the base64 decoded contents of the variable.
If set, this option will override the default config.user.inc.php with the base64 decoded contents of the variable.
The credentials you need to log in are stored in the MySQL server, in case of Docker image, there are various ways to set it (for example MYSQL_ROOT_PASSWORD when starting the MySQL container). Please check documentation for MariaDB container or MySQL container.
Customizing configuration
For example to change the default behavior of CSV export you can use the following configuration file:
You can also use it to define server configuration instead of using the environment variables listed in Docker environment variables :
See Configuration for detailed description of configuration options.
Docker Volumes
You can use the following volumes to customize image behavior:
Docker Examples
To connect phpMyAdmin to a given server use:
To connect phpMyAdmin to more servers use:
To use arbitrary server option:
You can also link the database container using Docker:
Running with additional configuration:
Running with additional themes:
Using docker-compose
Customizing configuration file using docker-compose
You can use an external file to customize phpMyAdmin configuration and pass it using the volumes directive:
Running behind haproxy in a subdirectory
When you want to expose phpMyAdmin running in a Docker container in a subdirectory, you need to rewrite the request path in the server proxying the requests.
For example, using haproxy it can be done as:
When using traefik, something like following should work:
You then should specify PMA_ABSOLUTE_URI in the docker-compose configuration:
IBM Cloud
One of our users has created a helpful guide for installing phpMyAdmin on the IBM Cloud platform.
Quick Install
Manually creating the file
Or, if you prefer to not be prompted every time you log in:
Storing passwords in the configuration is insecure as anybody can then manipulate your database.
For a full explanation of possible configuration values, see the Configuration of this document.
Using the Setup script
Next, open your browser and visit the location where you installed phpMyAdmin, with the /setup suffix. The changes are not saved to the server, you need to use the Download button to save them to your computer and then upload to the server.
Now the file is ready to be used. You can choose to review or edit the file with your favorite editor, if you prefer to set some advanced options that the setup script does not provide.
Setup script on Debian, Ubuntu and derivatives
Debian and Ubuntu have changed the way in which the setup script is enabled and disabled, in a way that single command has to be executed for either of these.
To allow editing configuration invoke:
To block editing configuration invoke:
Setup script on openSUSE
Verifying phpMyAdmin releases
Since July 2015 all phpMyAdmin releases are cryptographically signed by the releasing developer, who through January 2016 was Marc Delisle. His key id is 0xFEFC65D181AF644A, his PGP fingerprint is:
Beginning in January 2016, the release manager is Isaac Bennetch. His key id is 0xCE752F178259BD92, and his PGP fingerprint is:
Some additional downloads (for example themes) might be signed by Michal Čihař. His key id is 0x9C27B31342B7511D, and his PGP fingerprint is:
You should verify that the signature matches the archive you have downloaded. This way you can be sure that you are using the same code that was released. You should also verify the date of the signature to make sure that you downloaded the latest version.
As you can see gpg complains that it does not know the public key. At this point, you should do one of the following steps:
The problem here is that anybody could issue the key with this name. You need to ensure that the key is actually owned by the mentioned person. The GNU Privacy Handbook covers this topic in the chapter Validating other keys on your public keyring. The most reliable method is to meet the developer in person and exchange key fingerprints, however, you can also rely on the web of trust. This way you can trust the key transitively though signatures of others, who have met the developer in person.
Once the key is trusted, the warning will not occur:
Should the signature be invalid (the archive has been changed), you would get a clear error regardless of the fact that the key is trusted or not:
phpMyAdmin configuration storage
Changed in version 3.4.0: Prior to phpMyAdmin 3.4.0 this was called Linked Tables Infrastructure, but the name was changed due to the extended scope of the storage.
Zero configuration
The following three scenarios are covered by the Zero Configuration mode:
Manual configuration
If you already had this infrastructure and:
You can use your phpMyAdmin to create the tables for you. Please be aware that you may need special (administrator) privileges to create the database and tables, and that the script may need some tuning, depending on the database name.

