windows detected that the efi system partition was formatted as ntfs что делать
Windows Detected that the EFI System Partition was Formatted as NTFS: How to Fix
Suffering from the pain of Windows detected that the EFI system partition was formatted as NTFS? You will find the easiest way to fix EFI system partition error problem in Windows 7/8/10/11.
By Lucas 
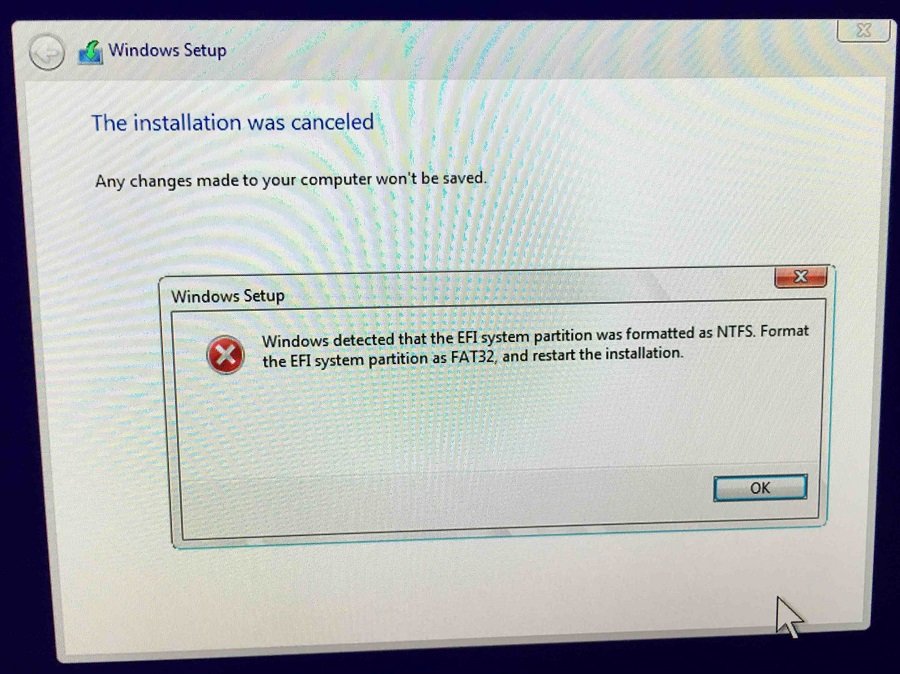
Windows detected that the EFI system partition was formatted as NTFS
Sometimes, you will be prompted by the error message: Windows detected that the EFI system partition was formatted as NTFS. There is a user wrote this:
I am trying to install Windows 10 onto my SSD drive, and it comes with the error message:
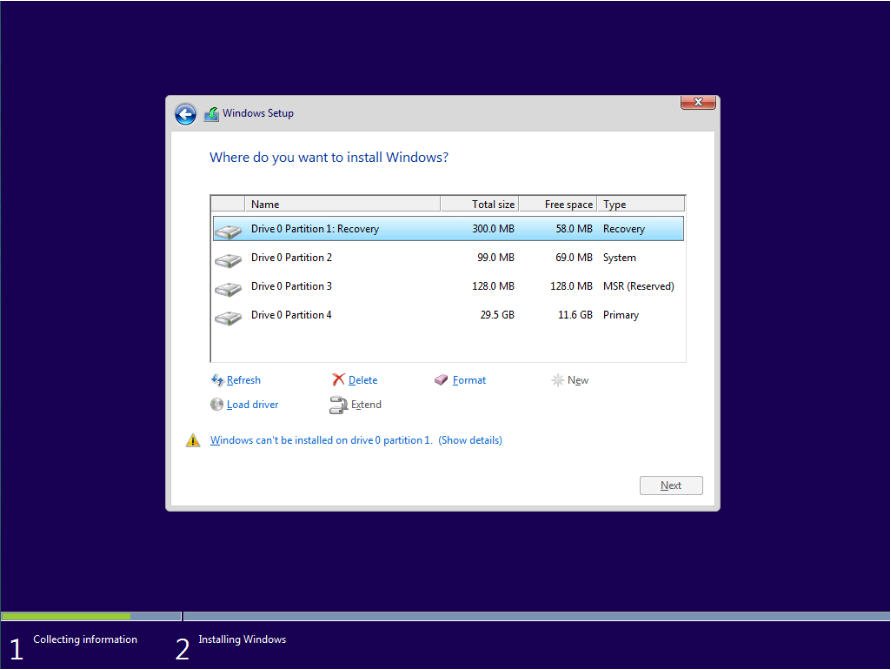
Windows detected that the EFI system partition was formatted as NTFS. Format the EFI system partition as FAT32, and restart the installation.
Thus, I put the SSD in my laptop and format as FAT32, when I do that, I get it telling me that it needs to be formatted to NTFS. I am so confused with the problem; please help me out, thanks.
What is an EFI System partition?
EFI system partition (ESP) is a partition on a data storage device and used by computers adhering to the Unified Extensible Firmware Interface (UEFI). EFI system partition capacity approximate 100
500MB and contains the boot loaders, device driver files, and system utility programs and data files such as error logs. UEFI firmware loads those files stored on the ESP to start Windows at the boot time.
The EFI system partition must to be formatted to FAT32 while Windows must be installed to a partition formatted as NTFS. Usually, you will generate an EFI system partition after installing Windows on a GPT disk. EFI system partition has no drive letter by default to prevent from the accidental deletion or modify.
How to fix Windows detected that the EFI system partition was formatted as NTFS error?
It’s easy to solve NTFS EFI system partition error. Delete all the partitions on the HDD until there is only unallocated space and then click the next key, the Windows will create partitions itself. You don’t have to change EFI system partition to FAT32 manually. Here are the steps:
Note: If you have important profiles on your HDD, please backup first, and then do the following steps.
1. Restart your PC. Press F2, F9, F10, Del or Esc to enter your BIOS to set your PC boot from the installation USB stick or DVD drive. Save the changes of the settings.
2. Insert your installation USB stick or DVD drive and restart your PC. Now your PC should now boot into the Windows Setup program.
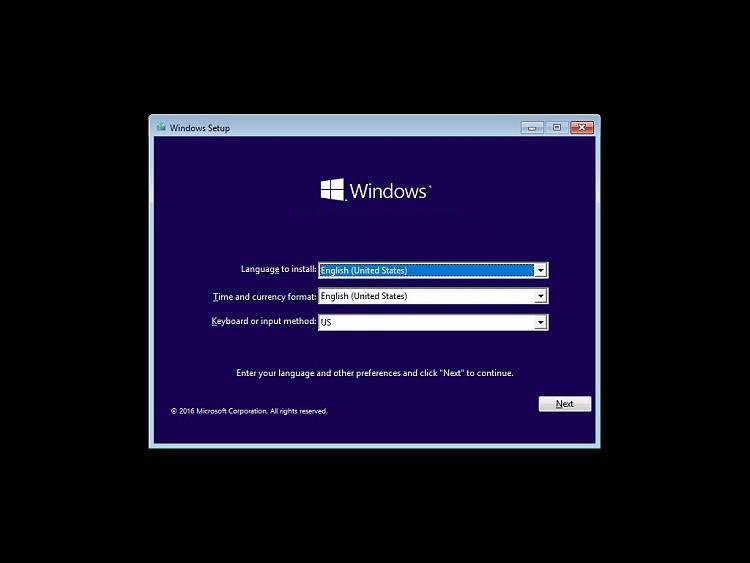
3. Choose language, time and currency format and input method, and click Next.
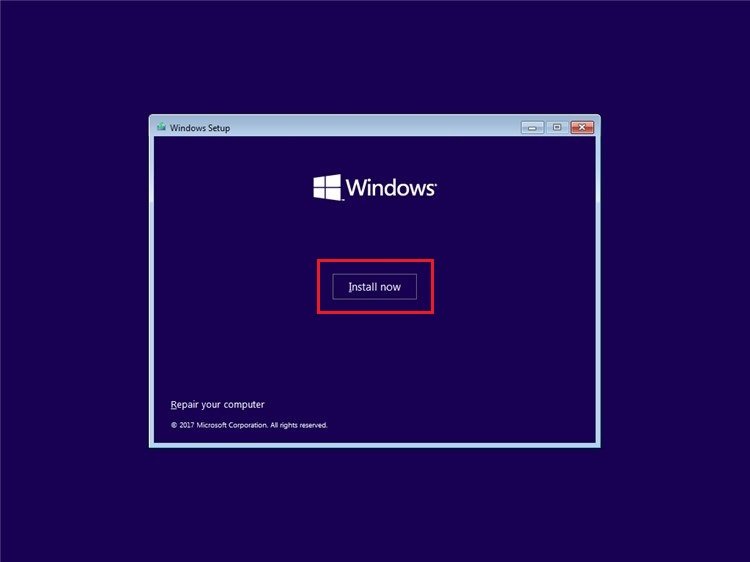
4. Press Install Now button. Enter your Windows Key if prompted, read and accept the software license.
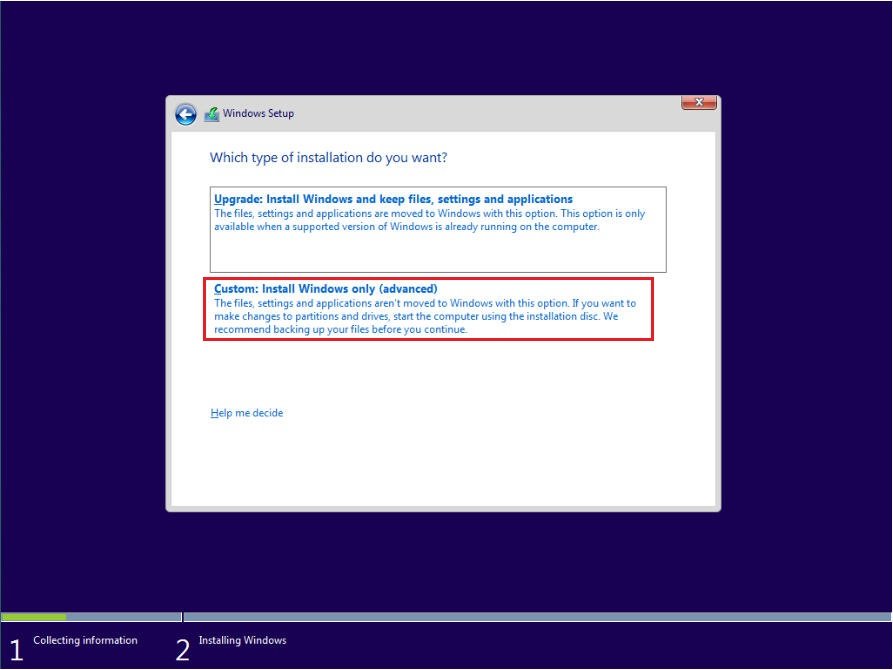
5. Select Custom: Install Windows only (advanced) at the Which type of installation do you want window.
6. At the next window, you will be prompted: Where do you want to install Windows? And several partitions (if your disk had an operating system previously) will show up. Click the partition and choose Delete, and delete one by one until there are only unallocated space.
Then the Windows installation process will go on smoothly. The Windows detected that the EFI system partition was formatted as NTFS problem will be solved now.
How to delete EFI system partition easily?
Sometimes, you may want to delete EFI system partition for some reasons. Generally speaking, EFI system partition cannot be deleted in Windows operating system. Thus, you will find delete volume is greyed out in Disk Management. How to delete EFI system partition easily? There are two ways to delete: DiskPart and AOMEI Partition Assistant.
#1: DiskPart
1. Press Windows + R to open the run dialog box, input diskpart and hit enter.
2. Then type the following commands,and execute one by one to delete EFI system partition:
list disk
select disk n(the n is the disk number of the system disk)
list partition
select partition n (the n is the drive letter of EFI system partition)
delete partition override
exit
#2: AOMEI Partition Assistant Professional
Another easier way to delete EFI system partition is taking advantage of AOMEI Partition Assistant Professional, which is a powerful partition manager for Windows XP, Vista, 7, 8, 8.1, 10 and 11. Here are the steps to delete:
1. Install AOMEI Partition Assistant and launch it.
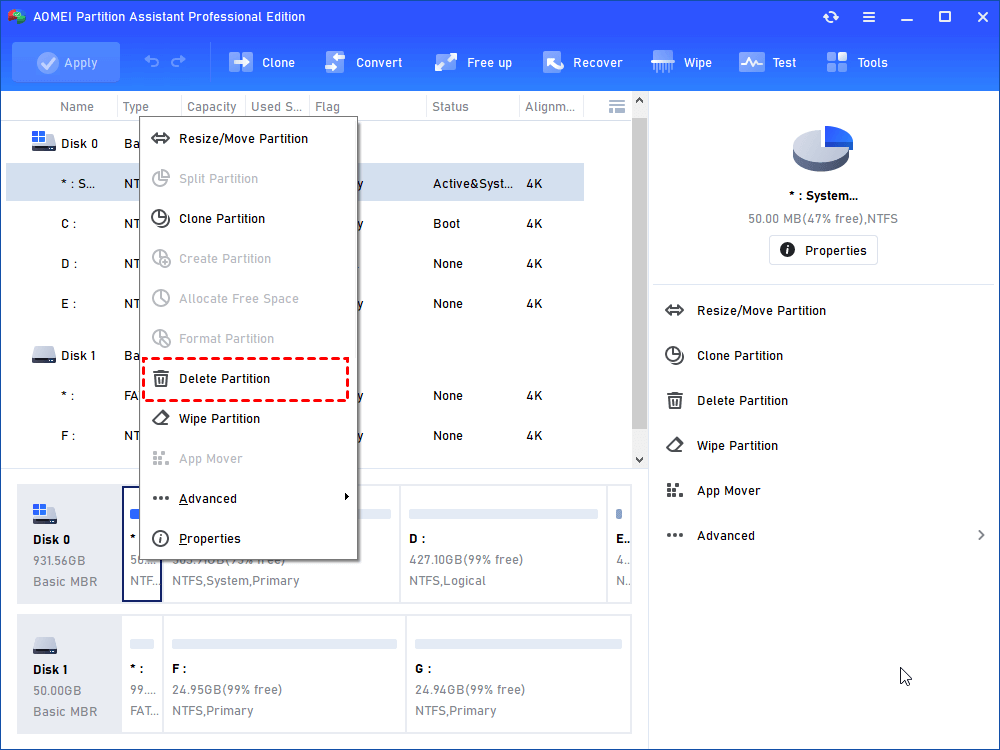
2. On the main window, right click EFI system partition and choose Delete Partition.
3. Then click OK after choosing delete method. And press Apply button to delete EFI system partition.
After you deleting EFI system partition, you will get an unallocated space, you could merge it to another partition to extend the free space. In addition, you might want to move EFI system partition and create EFI system partition, AOMEI Partition Assistant will satisfy you easily. You are also allowed to allocate free space, quick partition, use command line utility, and migrate OS to SSD, etc.
Восстановление удаленного загрузочного EFI раздела в Windows 10
В этой статье мы покажем, как вручную восстановить случайно удаленный загрузочный EFI раздел Windows на компьютере с UEFI. Мы рассмотрим простой способ ручного пересоздания загрузочного EFI и MSR разделов в Windows, который позволит вам загрузить ОС после случайного форматирования или удаления EFI раздела. Инструкции в статье актуальны для всех версий Windows, начиная с Win 7 и до Windows 10.
Итак, предположим, что каким-то образом случайно (или не очень случайно, например при попытке удалить с диска OEM разделы производителя) был удален или отформатирован загрузочный EFI раздел на компьютере с UEFI (не BIOS), в результате чего Windows 10 / 8.1 / 7 перестала загружаться, циклически предлагая выбрать загрузочное устройство (Reboot and select proper boot device or insert boot media in selected). Разберемся можно ли восстановить работоспособность Windows при удалении раздела с загрузчиком Boot Manager без переустановки ОС.
Структура разделов GPT диска для Windows
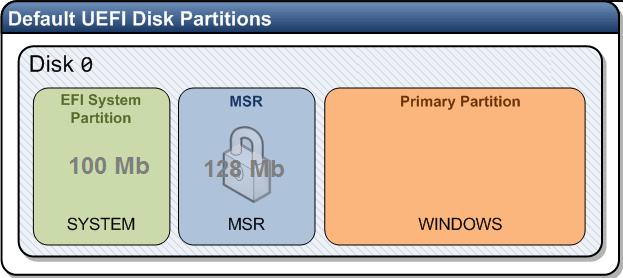
Рассмотрим, как должна выглядеть таблица разделов загрузочного жесткого диска с GPT разметкой на UEFI системе. Как минимум должны присутствовать следующие разделы:
Это именно минимальная конфигурация. Эти разделы создает установщик Windows при чистой установке системы на неразмеченный диск. Производители ПК или сами пользователи могут дополнительно создавать собственные разделы, содержащие, к примеру среду восстановления Windows в файле winre.wim (Windows RE), раздел с резервным образом системы от производителя (позволяет откатится к исходному состоянию компьютера), пользовательские разделы и т.д.
На основном разделе находится установленная Windows, программы и данные пользователя. Могут присуствовать дополнительные разделы с данными.
Что будет, если в Windows 10 отсутствует раздел EFI?
На EFI разделе (по аналогии с разделом System Reserved на дисках с MBR разметкой) хранитмя хранилище конфигурации загрузки (BCD) и ряд файлов, необходимых для загрузки Windows. При загрузке компьютера среда UEFI загружает загрузчик (EFI\Microsoft\Boot\bootmgfw.efi) с раздела EFI (ESP) и передает управление ему. Исполняемый файл bootmgfw.efi выполняет запуск основного загрузчика Windows Boot Manager, который загружает данные конфигурации из BCD. После загрузки BCD начинается загрузка Windows через winload.efi.
Также вы не сможете загрузить Windows, если EFI раздел отформатирован в файловой системе NTFS. Даже при чистой установке Windows в таком случае вы получите ошибку:
Как вручную создать EFI и MSR разделы на GPT диске?
Т.к. ОС не загружается корректно, нам понадобится установочный диск с Windows 10 (Win 8 или 7) или любой другой загрузочный диск. Итак, загрузитесь с установочного диска и на экране начала установки нажмите комбинацию клавиш Shift+F10. Должно открыться окно командной строки:

Выведите список жестких дисков в системе (в этом примере он один, disk 0. Звездочка (*) в столбце Gpt означает, что диск использует GPT таблицу разделов).
Выберите этот диск:
Выведите список разделов на диске:
В нашем примере в системе осталось всего 2 раздела:
Как вы видите, раздел EFI отсутствует (удален).
Наша задача удалить оставшийся MSR раздел, так чтобы на диске осталось неразмечено как минимум 228 Мб свободного места (для разделов MSR и EFI). Удалить оставшийся раздел можно с помощью графической GParted или непосредственно из командной строки (именно так и поступим).
Выберите раздел для удаления:
Select partition 1
И удалите его:
Delete partition override
Убедитесь, что остался только раздел с Windows размером 9 Гб (в нашем случае):

Создайте EFI раздел размером 100 Мб, отформатируйте его в файловой системе FAT32 и назначьте ему букву диска:
create partition efi size=100
Убедитесь, что в diskpart выбран раздел 100 Мб (звездочка напротив строки Partition 1):
list partition
select partition 1
format quick fs=fat32 label=»System»
assign letter=G
Теперь нужно создать MSR раздел размером 128 мб (в Windows 10 размер MSR раздела можно сделать всего 16 Мб).
create partition msr size=128
list partition
list vol
В нашем случае основному разделу с Windows уже назначена буква диска C:, если это не так, назначьте ему букву следующим образом:
select vol 1
assign letter=C
exit
Восстановление EFI загрузчика и BCD в Windows
После того, как вы создали минимальную структуру разделов для GPT диска на компьютере с UEFI, можно переходить к копированию загрузочных файлов EFI на диск и созданию конфигурационного файла загрузчика (BCD).
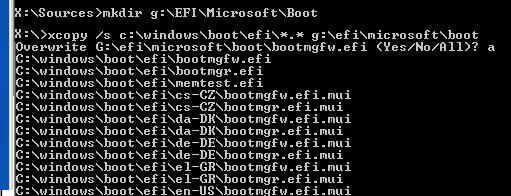
Скопируйте загрузочные файлы среды EFI из каталога вашего диска, на который установлена ваша Windows:
xcopy /s C:\Windows\Boot\EFI\*.* G:\EFI\Microsoft\Boot
Пересоздайте конфигурацию загрузчика Windows:
g:
cd EFI\Microsoft\Boot
bcdedit /createstore BCD
bcdedit /store BCD /create
bcdedit /store BCD /create /d “Windows 7” /application osloader
Вы можете заменить надпись “My Windows 10”, на любую другую.
Команда возвращает GUID созданной записи. Этот GUID нужно подставить в следующей команде вместо

bcdedit /store BCD /set
bcdedit /store BCD /set
bcdedit /store BCD /set

bcdedit /store BCD /set
bcdedit /store BCD /set
bcdedit /store BCD /set
bcdedit /store BCD /set
exit
Перезагрузите компьютер … В нашем случае с первого раза он не загрузился, пришлось дополнительно поплясать с бубном:
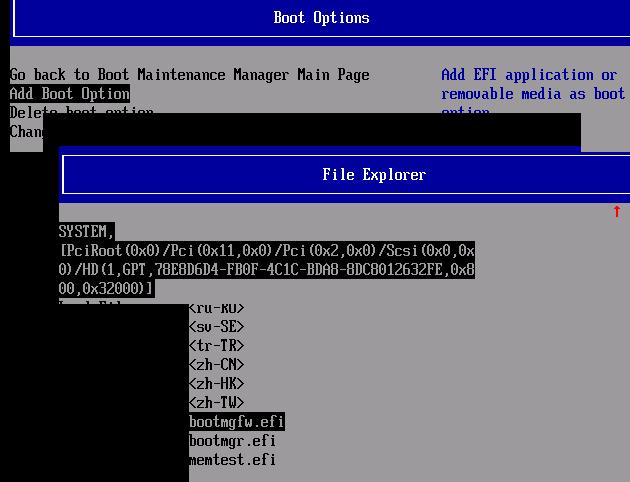
Затем в нашем случае (тестирование проводилось на виртуальной машине VMWare с UEFI средой) пришлось добавить новый загрузочный пункт меню, выбрав файл EFI\Microsoft\Boot\bootmgrfw.efi на EFI разделе.
В некоторых UEFI меню по аналогии нужно изменить приоритет загрузочных разделов.
После всех рассмотренных манипуляций Windows должна загрузиться корректно.
Does Windows want FAT32 or NTFS?
EvilVargon
Commendable
Im trying to install Windows 10 onto my SSD, and it comes with the error message:
Windows detected that the EFI system partition was formatted as NTFS. Format the EFI system partition as FAT32, and restart the installation.
No problem, just throw the SSD in my laptop and format as FAT32. When I do that, I get it telling me that it needs to be formatted to NTFS.
What am I missing? Surely It cannot request both NTFS and FAT32.
USAFRet
Titan
Im trying to install Windows 10 onto my SSD, and it comes with the error message:
Windows detected that the EFI system partition was formatted as NTFS. Format the EFI system partition as FAT32, and restart the installation.
No problem, just throw the SSD in my laptop and format as FAT32. When I do that, I get it telling me that it needs to be formatted to NTFS.
What am I missing? Surely It cannot request both NTFS and FAT32.
During the install, when it asks ‘where’, select Custom
Delete ALL existing partitions, leaving one large space.
Use that, letting Windows create what it needs.
Colif
Win 10 Master
Delete all the partitions on the hdd until there is only unallocated space and then click the next key, Win 10 should create the partitions itself.
Windows detected that the efi system partition was formatted as ntfs что делать
This forum has migrated to Microsoft Q&A. Visit Microsoft Q&A to post new questions.
Asked by:
Question
I have to convert EFI System partition (FAT32) to NTFS becasue unable to install Encryption software. I have to follow below steps.
—> Create new NTFS partition
—> Export boot config from existing EFI partition to new NTFS partition
—> set new NTFS partition as Active/System
—> Delete old EFI (FAT32) partition / it’s bootmgr entry
In MiniTool Partition Wizard, there is a option to convert FAT to NTFS which is disabled. I checked VisualBCD/EasyBCD where there is an option to create a new BootMGR entry & set this active but the cocern is how to export/copy data from existing EFI partition to new partition.
Kindly suggest how to achieve it.
All replies
You can use CONVERT driveletter: /FS:NTFS command to convert a partition to NTFS.
If you encounter the boot issue, use the Bootrec.exe to fix the boot issue.
TechNet Community Support
Thanks for your response. I have tried with convert.exe & the partition is converted into NTFS but unable to boot OS. EFI boot showing «Operating System not found». tried with Bootrec.exe /fixboot & /rebuildbcd but still same error. unable to boot with EFI. Is there any way to Export this Bootmgr config / convert partition to NTFS / Import the config again. will that work.
Try this command: bcdboot C:\Windows
BCDboot Command-Line Options
TechNet Community Support
Please try to use Windows 7 DVD to auto repair the system.
It is better to use the following method to move the boot file from the EFI parititon to Volume C:.
2. Bcdedit /export C:\Boot\BCD
3. Bcdedit /store C:\Boot\BCD /set
5. Bcdedit /store C:\Boot\BCD
— Verify that the change took effect
6. Copy C:\windows\boot\pcat\bootmgr C:\
7. Attrib +h +s C:\bootmgr
( The following steps make drive C as active partition).
Where disk 0 is drive C resided.
Where volume * is drive C resided.
14. Reboot the server and now, in Disk Management you can use this EFI partition.
How to Modify the BCD Store Using Bcdedit
Modify the BCD Store Template
What is the Windows Server 2008 R2 / Windows 7 System Reserved Partition?
Please remember to click “Mark as Answer” on the post that helps you, and to click “Unmark as Answer” if a marked post does not actually answer your question. This can be beneficial to other community members reading the thread.
Thanks for the detailed steps. I have tried to repair it with Win7 DVD but showing some error «system recovery options is not compatible with the version of windows you are trying to repair» whereas same DVD working fine on same another system. Can’t make Active partition because the disk is GPT. Now seems either my BCD Store is corrupted or not getting proper entry as it’s showing «The boot configuration data store could not be opened. the requested system device cannot be found» with BCDedit command’s. bootrec /rebuildbcd can able to find OS partition (C:\Windows) but after i select it, showing above error only (The boot configuration data store could not be opened). seems first i have to repair BCD Store).
Hey, i have the same problem here. 🙁
more details are in this thread in microsoft answers
actually, the error is where bootmgr cannot find the bcd store to boot from. bootmgr is successfully booted, and my bcdstore too is fine. i checked it by using
and it gave a valid store.
now the main question is «How to find the ‘requested system device’ when i have a gpt disk»?
It seems that bcdedit can’t find the BCD store. Could you please let me know how you export boot config from existing EFI partition to NTFS partition? Are you just copy the files or use Bcdedit?
Try to use bcdedit /store option see if it helps. If not, please refer to http://technet.microsoft.com/en-us/library/cc766223(v=WS.10).aspx to maunally use bcdedit to create a new BCD store.
Please remember to click “Mark as Answer” on the post that helps you, and to click “Unmark as Answer” if a marked post does not actually answer your question. This can be beneficial to other community members reading the thread.
before conversion to NTFS, i have exported BCD Store with BCDedit /export & after conversion imported it from that file. BCDedit /enum showing below details.
Windows Boot Manager
———————
identifier
device partition=\Device\HarddiskVolume3
path \EFI\Microsoft\Boot\bootmgfw.efi
description Windows Boot Manager
locale en-US
inherit
default
resumeobject <37851268-2551-11e2-8de5-835211c7dc46>
displayorder
toolsdisplayorder
timeout 30
Windows Boot Loader
——————-
identifier
device partition=C:
path \Windows\system32\winload.efi
description Windows 7
locale en-US
inherit
recoverysequence <3785126a-2551-11e2-8de5-835211c7dc46>
recoveryenabled Yes
osdevice partition=C:
systemroot \Windows
resumeobject <37851268-2551-11e2-8de5-835211c7dc46>
nx OptIn
diskpart showing below details.
DISKPART> list disk
DISKPART> select disk 0
Disk 0 is now the selected disk.
DISKPART> list volume
Bootrec is not showing OS partition with /scanos.
C:\>bootrec /fixboot
The operation completed successfully.
C:\>bootrec /rebuildbcd
Scanning all disks for Windows installations.
Please wait, since this may take a while.
Successfully scanned Windows installations.
Total identified Windows installations: 0
The operation completed successfully.
C:\>bootrec /scanos
Scanning all disks for Windows installations.
Please wait, since this may take a while.
Successfully scanned Windows installations.
Total identified Windows installations: 0
The operation completed successfully.
Can it be becasue BCDedit /enum showing, bootmgr is under HardDiskVolume3 whereas Diskpart showing volume3 is the recovery partition. i think it should be volume4. should we try to change this entry from Volume3 to Volume4.
Also very strange that bootrec /scanos is not showing any OS partition.
